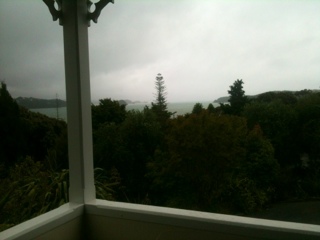
EEEkkk, here comes the blue sky!! Peaking from around the cloud, the sky is clearing, ready for the weekend and our trip up to the top of the Island to Cape Reinga. Looking forward to our first mini road trip! Loads to see. I'm then gonna drag Jenny round all the art shops we passed today in Kerikeri.
It's sunny folks, hooray for sun in December! I could live with this kinda Christmas.

Thursday, 6 December 2012
Wednesday, 5 December 2012
New zealand
I made it!! Didn't get lost, didn't miss any planes. All very stress free actually. Okay, it would have been rather lovely not to be in economy on the 27 hour flight! Talk about sardines. They do cram us in dont they, but it was good food, and I managed to sleep, and we landed early on both flights. My favourite flight was the tiny plane from Auckland to kerikeri. That was brilliant.
I was amazed at the peace and tranquility of the place where Jenny lives. It's beautiful. They are surrounded by little harbours and beaches, and it is so green and lush. Jenny lives in a tiny place called Russell, which many moons ago used to be quite rough - years ago of course. Now it has quaint shops, nice cafes and a brilliant chocolate shop (obviously had to go there pretty soon on arrival!).
We're planning to go and see where the hobbit was filmed (us little uns will fit in rather well there). And have a day in Auckland as well. Otherwise, lots of chatting, a little booze, and hide and colouring in with Juliette!
I hope my codes working on the web site, so anyone wanting to treat yourself and save some cash will be able to get 10% off their order - which I will be sorting upon my return.
Photos are the view from Jenny's house, Jen and me - and a bug!
Sunday, 2 December 2012
First leg of the journey!!
Well, I've found the car park, managed to get through security, and even got to my boarding gate without having to have that awful announcement that names and shames you as the last person to board!! New Zealand here I come! Very excited indeed.
On the drive down I stopped at some services and saw 6 ladies sat in Starbucks knitting! I was tempted to get their photo - they looked ace.
Right, lets see if I'm sat next to anyone or if I can stretch out, fingers crossed xx
On the drive down I stopped at some services and saw 6 ladies sat in Starbucks knitting! I was tempted to get their photo - they looked ace.
Right, lets see if I'm sat next to anyone or if I can stretch out, fingers crossed xx
Saturday, 1 December 2012
Paint and a parcel
Back to parcels, this time make your own decorative parcels - easy and fun.
I used my EK Success circle punch and punched through a piece of card. I then used three different shades of Eco Paint and sponged through my circle. Viola, your very own mask!! How easy is that. Cut your paper to size first, apply the ink with a cheap sponge, and don't add to much paint. You are working with cheap paper, so you do't want to soak the paper. I used orange and reds, which looked great when you add a silk crush orange ribbon. You can use any colours, get them to match your colour scheme.
I did also create a wonderful mask using my lovely Martha Stewart snowflake punches and sprayed repositionable adhesive through the mask. I just did a couple at a time, and then added my smelly powder! This is created using a tub of ground cinnamon mixed with gold glitter. It works perfectly with the brown paper, and of course smells great! I love this technique. Imagine the different smelly powders you could create. One lady came over to me and told me her Dad loves curry, so she was going to make a curry glitter powder! Amazing. You could of course, use this with talc for baby pressies etc. Unfortunately I can not share a picture of this one, as it got picked up (or put somewhere safe) after my last demo. Sickner, as it was my favourite. I finished my smelly parcel with a lovely scented ribbon. This is so easy. Use the cream vintage ribbon and add drops of room scrent. Rub this into the ribbon for a fabulous scent. I used one I picked up from Sainsburys, it was one of the scents that generally comes with the reeds. On it's own it was rather over powering, but a little on the ribbon was great.
Let me know how you get on with your smelly pressies!!
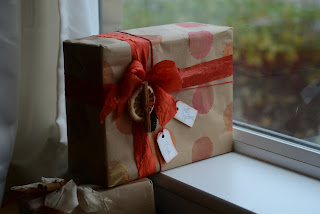
 I used my EK Success punch for the tags, and then dried my own oranges. This is easy. Cut your oranges into thin slices, and try to remove as much juice as possible. You can put them in the oven, but as I'm rather tight, I liked to dry them on the radiators, on top of my gas fire, and in the airing cupboard. If I had the oven on however, a few would be popped in on the bottom shelf!
The small cone (unfortunately you can't see this very well from the photo), was attached to the parcel using Cosmic Shimmer clear drying glue!
I used my EK Success circle punch and punched through a piece of card. I then used three different shades of Eco Paint and sponged through my circle. Viola, your very own mask!! How easy is that. Cut your paper to size first, apply the ink with a cheap sponge, and don't add to much paint. You are working with cheap paper, so you do't want to soak the paper. I used orange and reds, which looked great when you add a silk crush orange ribbon. You can use any colours, get them to match your colour scheme.
I did also create a wonderful mask using my lovely Martha Stewart snowflake punches and sprayed repositionable adhesive through the mask. I just did a couple at a time, and then added my smelly powder! This is created using a tub of ground cinnamon mixed with gold glitter. It works perfectly with the brown paper, and of course smells great! I love this technique. Imagine the different smelly powders you could create. One lady came over to me and told me her Dad loves curry, so she was going to make a curry glitter powder! Amazing. You could of course, use this with talc for baby pressies etc. Unfortunately I can not share a picture of this one, as it got picked up (or put somewhere safe) after my last demo. Sickner, as it was my favourite. I finished my smelly parcel with a lovely scented ribbon. This is so easy. Use the cream vintage ribbon and add drops of room scrent. Rub this into the ribbon for a fabulous scent. I used one I picked up from Sainsburys, it was one of the scents that generally comes with the reeds. On it's own it was rather over powering, but a little on the ribbon was great.
Let me know how you get on with your smelly pressies!!


The small cone (unfortunately you can't see this very well from the photo), was attached to the parcel using Cosmic Shimmer clear drying glue!
Subscribe to:
Posts (Atom)