Thursday, 24 November 2016

Efcolor Low Heat/Cold enameling - Let Leonie Loose

I had a wonderful day yesterday with my wonderful Efcolor cold enameling show.  It's so addictive, and FUN.  And the results feel and look so professional.

The wonderful thing about it is the small little oven you need to melt the enamel powder.  This isn't the high melt enamel powder made from glass, this is low melt and made from resin - so is harder than embossing powder, which is why it's perfect for jewellery pieces, and it looks really good!

And look, enamel paper flowers!  How cool are these.  Simply cover both sides with the enamel powder, and melt.  Adding different colours in layers, and melting each time.  The enamel powder holds the micro beads, and it will also hold swarovski crystals.  Make sure you use the right crystals, as you don't want anything melting in the oven.


This next piece is stunning, and easy.  Melt a layer of black and let cool.  Add a little versamark ink to the piece and stick gold leaf in place.  Now cover with transparent powder, this will encase the gold leaf and protect it.

This next one is great for a book cover, or for framing.  I melted a layer of pink in the centre and silver glitter at the top and bottom.  Let this cool, and then use a mask and sprinkle over white enamel powder - dusting it lighter as you move out to the edge


Use your die cuts to create patterns!


When the powder is hot, you can manipulate it, and swirl it.  How pretty is this!


Mine are only pieces I've played with - but you need to check out the incredible work created by Fiona, she is fantastic.  Have a look at her web site:
projects4crafters.com
to see loads of wonderful idea's....such as the following


Monday, 21 November 2016

All Counties Craft Challenge

Well, what a wonderful weekend.

I want to say a massive thank you to John Bloodworth for inviting me to take part, and for the organisation he put into the event.  It was amazing.  I loved catching up with some of my lovely friends, who I haven't seen in ages, that'll be you Paula (with her fantastic book), Julie, who actually attended classes, and Sarah, looking stunning as ever.  I even saw Dean who was teaching some fantastic techniques for furniture and mixed media.  And it was so so good meeting wonderful crafty ladies, and teaching again.

The positive energy was fantastic.  It's so nice to be with people who have such good energy, and share the passion for creativity. It's utterly uplifting and definitely inspiring.  It reminds me why my job is so incredible (as if I ever forget).  I've come home with a wonderful glow and that lovely excitable tingle you get....do you know what I mean.....when life feels good!  When anything is possible.  When you are just thankful for where you are in life......am I sounding a bit gushy?

If you want to follow John's travels, or maybe even go along to one of his workshops, then please head on over to his blog:

https://gentlemancrafter.com/all-counties-craft-challenge

It tells you much more there, and there will definitely be dates for your diary.

Thank you to the lovely ladies who came along - as usual I hardly took any photo's, so if anyone has some to share, that would be super!!!


Monday, 14 November 2016

Prepping

Hi folks,

I thought I'd do a quick post, just to say hello.

I've had a busy day prepping. I've loads to do, first was a magazine article, done and dusted and in the post....phew.

Next, I have to get ready for my workshop at the weekend. Really excited, but realised it's THIS WEEKEND!! Argh.

I also have a one day special launching on Wednesday. We're having a mega flash sale of some of my ranges!! Definitely worth tuning in for. I've got my demos to get ready for that one.

I've also got my normal Let Leonie Loose show which I need to prep for. However, slight problem, I still haven't got the goodies to play with!! Gulp. Talk about cutting it fine 😂 It'll be okay on the day.

For the magazine article, I used some of the really cool Azoline stamps, which we have had on Hochanda. Love these stamps. I mixed them in with my own products - and the results were really cool. You will be able to see the full article in Cardmaking and Papercrafts, this will be the February article!

They go so well with my stamps - which you will be able to pick up for a steal on Wednesday evening, I do believe (all the secrets!!)

Right, back to work xxx

Friday, 11 November 2016

Craft Workshops with the lovely Gentleman Crafter .....and LOTS of friends

I can't wait!!  Next weekend we will be travelling to Surrey to do some workshops with the lovely Mr John Bloodworth as part of his craft challenge, where he's raising lots of money for the charity, Mind.  John has been touring the country, educating and inspiring.  I'm very privileged John asked me to join him on one of the weekends.  And we have got a brilliant team to craft along with.

Have a look at the attached link, if you haven't heard about this yet.  I know there are still places available.

It's a brilliant way of giving cash to a very good cause, but also having a laugh and getting crafty:

 https://gentlemancrafter.com/2016/07/25/all-counties-craft-challenge-group-workshop-surrey-weekender-part-2/

I hope to see you there xxx
Manor House Preview

Tuesday, 8 November 2016

Sparkle pens and embossing powder!

Evening folks, I hope you are well.  What crafty delights have you treated to yourself lately?  Anything good?  I have been quite reserved of late - mind you, having the Wednesday shows does mean I'm really really lucky, and get to pick amazing products to work with....there's always something else I fancy though.  Addictive this ere crafting isn't it!!

Now then, talking of Wednesday, I wanted to share another demo I'm going to be doing.  This time I thought I would have a play with my glitter/sparkle pens, and embossing powder!

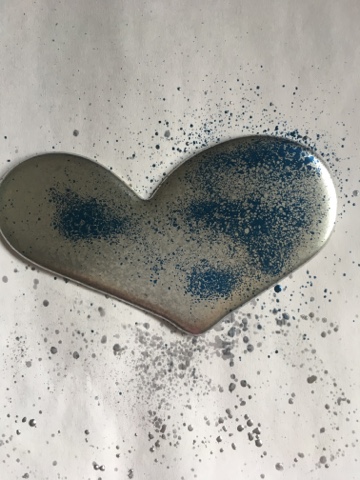
First, I cut hearts using my Lots of Love mixed media die.  This is a deep die, so allows me to cut through thicker materials.  This heart is cut from mount board. I covered the heart with versamark and then melted it with my heat gun, repeat this until you have 3 layers.....but on the 3rd layer


......drop in ink directly from the sparkle pen, and then heat.


Take a pokey tool or a cocktail stick, and swirl the ink around in the embossing powder.  This will give you a lovely pattern.  Reheat the image - you may also want to put another layer of embossing powder on the heart, to trap the mica 


I love the subtle sparkle from the ink, and the texture the ink creates


I used my lovely heart as an embellishment on my card, which I also used my Fairy Godmother, coloured in with the Sparkle Pens.  The background is my lovely Softly Falling Embossing Folder.


I hope you like it - I'll demo this on Wednesday - fingers crossed it goes right!!


Monday, 7 November 2016

Part Stamping

Hi again folks, another blog post!!  Whoop Whoop.

Now, on Wednesday's Let Leonie Loose this week, we have got a really good price on some of my stamps - so I thought I'd have a little play and share what I've been doing with you.  You will be able to see me demo these live.

First, I cut a couple of hearts using my deep heart dies, I love these dies as they allow me to cut out of thicker materials, like mount board - which means we can get our triple thick embossing powders out!!


I coated the first heart with versamark and covered it with triple thick embossing powder.  I melted this with my heat gun, and applied another layer of powder whilst the first layer was still molten and hot.  Repeat this until you have 3 layers of powder, which will give you a lovely gloss finish.


I then used some of my coloured ultra thick embossing powders.  Silver from Crafty Notions, and a lovely blue from Cosmic Shimmer


Emboss a layer of silver first, look how smooth the finish is, it's stunning


While the silver is warm, sprinkle on some of the blue embossing powder, and emboss.  I sprinkled on some more silver, until I was happy about the colour


Now, whilst the embossing powder is still warm, stamp into it.  I used my Festive Texture background stamp, which I designed so you could use it as a background stamp....but you don't have to use the full stamp - this expands the possibilities.


And, because it's an unmounted stamp, it's really easy to bend, so this allows me to be really specific which bit of the stamp I use - and I love the look of just a little texture, I think it looks really cool


Have a play, it's easy and effective


I hope you can join me on Wednesday, Hochanda. 2-4.  Seeya then :) xxx

Sunday, 6 November 2016

More Christmas Decorations

Hi folks, well the baubles continue!  Here are a few more of my creations from last Wednesday's show, I hope you like them :)


This first one is a decorated acrylic shape.  These are brilliant.  They are so cost effective, and have so many uses.  This was so easy to decorate.  I coated one half of my heart with the acrylic lacquer, and dipped it in silver glitter.  I then coated the second half and dipped it into micro beads.  I left it to dry before removing the excess micro beads (over a box, they tend to get everywhere!).  I then wrapped a ribbon around the heart and glued on a little bow.  Viola. 


My next acrylic shape - peel offs!!!  I wrapped the peel offs round my shape, and then coated the whole shape with 3D glitter - this is clear drying and the glitter will sparkle through. I then added dots onto the end of the peel off dots, this is transparent so dries beautifully.


Next!!  This is so simple. I simply covered with alcohol inks, allow it to dry and then used the 3D liner to stamp. Put some of glaze out onto a mat and sink the stamp into it, and stamp onto the shape. I love this effect, as its quite random. I also love the texture it creates when it dries.


For this one I coated one side of my shape with the lacquer and dipped the whole shape into gilding flakes. Allow this to dry before removing the excess flakes. When its dry stamp onto the opposite side using staz-on as this will dry quickly.  Then coat the back of the flakes with the 3D liner, this will dry and give a lovely shiny finish on the reverse.


Last one, and this is so easy.  I used my 3D Liner to draw on my acrylic shape.  This dries raised, but you can also paint it on, which I did on the reverse with the clear drying glitter.  It's lovely as it shines through the acrylic shape.

As usual, thank you for popping on b:) xx

Saturday, 5 November 2016

Design Team......give a warm welcome to the lovely Claire

My design team is made up of a very talented bunch....and I'm happy to say Claire isn't just crafty, but she's also a brilliant director at Hochanda!  Here's a little more about our Claire:


 Claire has a crafty Facebook page that she posts her crafty activities to: www.facebook.com/thecherrypickedcrafts

 First, please tell us a little bit about yourself and how you got into crafting?
I'm Claire. 28 from Kent originally, now living in Peterborough. I'm currently working as a Trainee Studio Director at Hochanda with the lovely Leonie. I started crafting when I was really young with papercraft. Making cards for people's birthdays, the usual kid crafting. I slowly learned more and more as my Nan opened up a craft shop and got into different crafts like needlework. This slowed down a little as I was busy with my education for a few years, but I got a job working at Create and Craft and got back into the crafting world learning from the shows and offen spending too much of my paycheck on new crafty goodies. I'm now at Hochanda doing much the same but with more spare time now to get the crafty juices going again. 

Have you got a favourite craft, or do you like doing a little bit of everything?
I really do like a little bit of everything. I'll often walk into my craft room and see what takes my fancy that day or even get sudden inspiration to make something and end up forgetting what I was doing. I'm going through a sewing phase at the moment. 

What's the most rewarding thing about crafting for you?
The look on the persons face when you hand them something you've made. They realise you've taken the time out of your day to make something unique for them. That's the best gift you can give and receive. 

Have you ever sold your craft work?
I did a few commission pieces, but mostly I just craft for fun or gifts.

Finally, what crafting tool could you not do without?
Ooo that's a tough one! I think it would be my fineline sharpie. Good for drawing on your own designs, filling in any gaps you've missed stamping and then of course filling out the inside of the card to send off. 


Watch out for Claire's lovely creations, and check her facebook page out as well :)

Friday, 4 November 2016

Christmas Baubles!!

I thought I'd do a post!! Last week I had lots of Christmas baubles to decorate, which I really enjoyed!  It's lovely to do something different, and have a play.  I thought I'd share a few of the designs with you:


The first bauble (these are glass), was coated on the inside with Cosmic Shimmer Glitter Jewels.  I did this by spraying Crafters Companion spray adhesive into the bauble.  This coats it enough in adhesive so when I put the Glitter Jewels in, and gave it a shake, it coated the entire bauble.  And looks really pretty.  
I then took some die cut snowflakes and popped them on my craft mat.  I coated these with clear drying glue.  This softens the card so it will easily wrap around the bauble.  I applied another coat over the top, to make sure it sticks properly to the bauble, and then leave it to dry.  Easy and perfect.


Next, I used one of the open baubles which are designed for you to either build inside the bauble, or pop a tea light in there for extra sparkle.  I mixed the acrylic lacquer with a tiny little pixie powder, and then applied to the bauble.  Dab it on to create texture.  I love this, as the lacquer dries clear, and the pixie powder shines!


The final one for today is very easy...I've simply used Cosmic shimmer pva to apply jute cord to the bauble.  I've then wrapped pretty lace around the bauble, and then ribbon.  I then managed to get really carried away decorating the bauble with die cuts.  Very easy indeed!

I'll pop a few more on tomorrow.  Thank you for visiting :) xx