
Anyhow, here goes. So, the challenge was to use
Scraper foil
Acetate
Gilding wax
Thank you for the challenge, Ruth, please send me your address and I will send the finished card to you, my email is leoniepujol@hotmail.co.uk
The search for scraper foil was successful, I found professional grade scraper foil, with a selection of tools! Who knew it was such a thing. I restrained myself quite well, and didn't buy the whole kit, but I did buy enough to have a play.
The experiments began:
Scraper foil is essentially, a coated card. You can get different colours of foiling, I used a holographic. I remember this stuff when I was a kid, you could buy them with images printed on, which you then scraped off to reveal the foil which looked quite stunning against the black. I started by coating my foil with gilding wax

I then ran it through the embossing machine with an embossing folder. Using sandpaper, I removed the black coating, which reveled the holographic foil. The part which had been debossed retained the gilded finish


I then decided to add a little alcohol ink to the foil, to see how that looked

Pretty cool

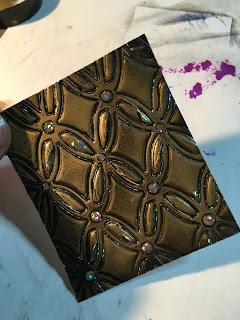
My second piece was gilded and embossed

But this time, rather than remove all the coating, I used the scraper tool to just remove sections. I like this, the foil almost looks like little gems. It really suits the embossing folder as well. This folder is one of the Couture Creations folders, I'm not sure which one but I can check if anyone needs to know

I changed to the bronze gilding wax, to see how that would look using the same technique


But the one that I went with was the silver. This time I was quite heavy handed with the silver application, however I still wanted some of the black to show, as I feel this is integral to the design, and the reason I am using scraper foil

I continued playing - as obviously I haven't anything else to do (fooooollll). This is a die, which I embossed as opposed to die cutting, and a different embossing folder


I like how you can just scrap sections of the image, so can be quite specific

As I had played for quite a while, I decided to work on a quick card. I embossed a larger piece of the scraper foil card, and covered it with the Pebeo gilding wax. Allow it to dry for a few moments, then buff it off with a soft cloth, for a beautiful sheen

Now scrap off the coating in the centre of the circles. I used a cross hatch design, which looks quite effective.

I then used the same embossing folder to emboss the design on some acetate. This is the heavy weight acetate. I used adirondack permanent pens to colour in the leaves

When this is laid directly over the top of your card, the leaves really stand out, and look almost jewel like

I used black and a stunning green metallic card to mat and layer

Obviously acetate is tricky to stick down, so I cut my card layers down first which I intended to strap across the front of the card

I stuck the card to the acetate, using strong double sided tape

And then added adhesive under the layer of card, onto the acetate. This allows me to stick the acetate to the card, whilst hiding the glue

I finished the card with a sentiment, ribbon and a few little gems

You can see the added texture the acetate adds to this card

I hope you like your card Kim. Thank you everyone who joined in this time, I plan to ask you for challenge idea's on Monday - so get your thinking caps on, and we'll see how many good suggestions I get this time. It'll be the last challenge before....the Big Day!! eeeekkk xx
Night all :)