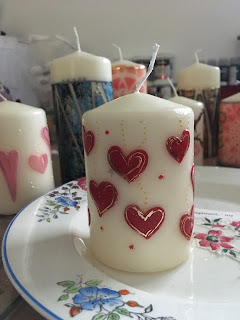
I have wanted to share this post with you for days, but have only just got round to it. This week on my Let Leonie Loose show, I took a bit of a risk and put on some candle decorating things. We didn't know how this would go - but I was really happy people seemed to like them. I must admit, it's another line of products that could be used in so many ways, given time to have a proper play. I really enjoyed the short time I had to experiment.
First, I used the sheets. These are pre-coloured, and in some cases, designed, wax sheets, which are simply layed onto your candle. No need to heat, glue or anything. As long as your room is at a nice temperature, they will adhere. And you can do loads with them.
First I took one of the printed sheets and simply cut it into shapes with a craft knife
With this one, I added the wax paint along the edge of each piece of wax. I added dots and lines, which look really cool. To finish it off I also added another gold border along the top of the candle.
This one is much more time consuming. I used a spellbinders die to cut my wax sheet. Be careful not to use to much pressure, and protect your surfaces with a wax sheet - I didn't - I now have wax all over my cutting plate! Use talc on your die to help the wax sheet release from the die. I was quite impressed it cut this detail - but I don't think I'd try anything more complex. The branch then easily sticks to the candle.
I built up my wax blossoms, I love this mother of pearl wax sheet, it's beautiful. I also added little dots with the wax pearl paint, which just finishes it off.
Next, I used the candle wax paint. This is SO easy. Literally hold your stencil in place, and use a sponge to dab the paint onto your candle. You can mix and blend the colours, and they dry really quickly. I think it looks fantastic. I finished the candle with the wax border strip.
This is easy. You can either cut the wax sheets free hand with a pair of scissors, or, as I did, use your dies. I used my collection of mixed media dies, which are nice and thick to go through the wax easily. I didn't run them through the machine, I simply pushed the wax into them. I then used the foil sheet to add a touch of silver. This easily adheres to the wax by just using a ball tool.
Obviously, the wax doesn't have to just be used on the candles. This was my favourite bit...using them on my Art Journal. I simply sponged the wax through the stencil, then used my distress inks over the top. The wax acts as a resist. It's so effective. Can you imagine the different looks you could achieve!! I've got to play a bit more with this!!!


6 comments:
What a great product and love your projects, they're fantastic! Will have to check out the show....just wish LLL was on a day when I'm at home. X
Unfortunately I missed your show so thank you for posting all about the wax. Really interesting and love the effects.x
This looks very interesting.
Hi Leonie, These were amazing, I so loved watching you !!
Lots of love from Patricia xx
Wow what fantastic things you have made, love them all.
Thank you folks. Remember Hochanda do a catch up service, so if you do miss shows, you can always watch them back again. The wax sheets are so cool - the designs are beautiful. I'll definitely be using these again!! xx
Post a Comment