Tuesday, 11 February 2014

Marbling fun!!

Hey crafty folk.  I know how I always babble on about how much I like my job, but it's true, I really do.  I especially like it when we have something brand new that is one of those that I just have to try.  And this time it was marbling.  

Now, I don't know about you, but I remember this as a kid.  It was ace, but it seemed like a lot of faff, and the patterns always seemed the same.  So, when we had Craig in recently (from Marbling4fun), it was such a relief to see my childhood memories definitely were a thing of the past when it came to what you can now do with this ace hobby.

Craig has put together a kit that is pretty easy to use, but very very good fun, and the results are amazing.  It is all made and sourced in the UK.  Non toxic.  Not to messy, and very affordable.   All you need is soft water (this was the only thing I had trouble finding actually, but next time I'll order it off the computer rather than searching Peterborough).  

My first attempt was actually for my magazine piece for Cardmaking and Papercrafts.  Of course I'd try this brand new hobby as my magazine article!!  No pressure.  And of course I would do it with absolutely no time to spare....this is as on the edge as it gets in my crafty little life!  However, I was pretty lucky, as I loved my first attempts. I marbled card, a chipboard letter and a little box.  Easy peasy (isn).  I need to practice, there's no doubt about that, but the basics are so easy to get to grips with, and I know what I need to do to make it better next time.

Normally I share photos - but I can't this time I'm afraid, you'll have to watch out for them in the magazine.  I'll just share the colours looking amazing floating around on the floating mixture just waiting to be printed:


Thursday, 23 January 2014

THANK YOU

I am so chuft, and surprised, I have just found out that I have won the Craft Award for the Crafts Beautiful for the Best Craft Presenter/Demonstrator.

Thank you to everyone who took the time to vote, I really am so touched that people voted for me.  And thank you for tuning in and joining us on Create and Craft.  It's a wonderful job, and so much better when I know people at home are enjoying the crafting, and a few giggles.

Without you lovely folk there wouldn't be a Create and Craft, and I wouldn't have a shiny award.....so, again, THANK YOU


Tuesday, 21 January 2014

Easy envelopes with your brother scan and cut

Evening crafters, in the middle is my cleaning sprea, I decided to interrupt the dull hoovering to just have a quick go at something I was thinking about when I should have been sleeping.

Now, this is very easy and obvious, so I know a lot of you out there will have already done this - but for those of you a little bit like me, plodding along with their new toy, then this is for you.

Envelopes. Ridiculously easy with the brother scan and cut. Simple take an existing envelope, place it on your mat and scan, using the save data option. Save to your brother or USB stick thing.


Now fully open out the envelope - making sure you don't leave torn strands of the envelope poking out, otherwise it will scan these as well. Scan and save:


That's it, you now have an envelope and an insert for really posh envelopes!!

All you need to do now is choose your paper, bring up your saved template, make sure it's only picked up the scan lines (delete any you don't need) and then cut. For the insert,  simply reduce the size a little so it'll fit neatly into your envelope:


Posh envelope!!

Because you are using your brother, if you have the pens, you would be able to write on the envelope! You would also be able to cut a fancy top flap using one of the borders already installed on your machine.

And, you could even scan a scrap of paper, the same size of your card, and see if the envelopes you have stored will fit your card, before you need to start cutting. This means you would be able to alter the envelopes size so it will fit the actual card you have made. As long as it fits on your cutting mat, then your envelopes should be nice and easy from now on :)

Monday, 13 January 2014

The CHA continues

Hi folks,

Well, I'm already sitting in bed at 9pm - and actually struggling to stay awake!!  The party animal has left the building.  The beds in this hotel are ridiculously comfortable...not going to fit it in my suitcase however I try.

Today, we had the incredible Carol Smith.  She's such a star, and she has brought the brilliant Mod Podge and Gallery Glass to C&C.  Really good products, if you do want more inspiration relating to Gallery Glass, make sure you check out Carol's blog:
http://galleryglassclass.blogspot.com/

There's loads of idea's on there.  It's such a clever product, and has definitely stood the test of time.  It was an absolute joy to work with Carol again.

I have posted quite a few photo's on Facebook, some wonderful samples from the brill show from Heartfelt Creations - obviously do check out Sue Wilsons blog, again some incredible creations:

http://particraft.blogspot.com/

And obviously the show itself is incredible, today Mel and myself went to see the incredible Graphic 45.  I took so many photo's!!  Their stand is just amazing.  So many idea's - this is paper!!  This is what you can do...with paper!!  It has to be damn good stuff though :)  here's a few of their creations:


I'll pop more on FB for you.  I love the fact they decorate everything and anything.  You can definitely use your Mod Podge to do the sticking as well.  It does make you look round at old furniture, boxes and more to decorate.  I love the sea side papers, I'm sure I could actually smell the sea.

Tomorrow is our last day.  It's gone so fast.  Paul will be starting the day tomorrow, and I get a wee lie in.  I have a spellbinders show, really pleased as I've missed out working with Stacey and Kim this time.  Mel is going to be showing us some new EK Success punches. We have a lot more...but my eye's are shutting so I had better switch off and go to sleep.

Thank you for joining us everyone, seeya tomorrow xx

Friday, 10 January 2014

Brother scan and cut part one....

Has disappeared!! You will not believe how gutted I am! I blogged an hour of work and posted it, but it's disappeared. That's really frustrating. I'll have to do a really quick over-view.

In an hour I managed to learn (from the quick start guide), how to set my machine up, load the blade and mat. The guide tells you the blade setting and depth for the material you are cutting.

I found it really easy to get started on the basics. I cut shapes, and then scanned a pre-printed image in which the machine cut for me. The cut was great. One of my images didn't register however, so I need to read my in depth instructions as to why one image from 4 wasn't picked up. 

The quick start instructions will get you cutting and scanning with ease, but then you will want to pop your cd into your computer to see the full instruction booklet. 

I'm so sorry, my first posting had loads of photos :( ah well.

For more ideas, information and great detailed demos join myself and Mel for the launch of the brother machine on Crete and craft, Saturday, 2pm.

Ahh, one more thing, this machine is incredibly light. That's such a bonus as it really does make it handy to take to classes, your crafty friends house, or to simply pack away at the end of your crafty day.

Brother Cut and Scan part two

Running out of time!! Gutted, will I have to hand my machine back??

Okay, so I have learnt how to scan and cut a border or a frame round my image. Very easy indeed. I've also learnt how to cut some of the pre-designed images that have layers. Again, simple. You can layer your designs and amend them as one:


Now welding. I am currently working my way through the cd. This is the full operational manual. There are plenty of extra help files on line as well.

To weld you simply choose your patterns, and arrange them on your mat/screen so they overlap. I found the enlarging tool really handy to see if the images were over lapped properly. I would have liked to work whilst this function is selected, rather than having to keep going back to my small screen - but it's still very quick and easy.


When your happy, just hit the weld button. I've done it again with hearts:
Two separate hearts:

Overlap by dragging the images on your screen


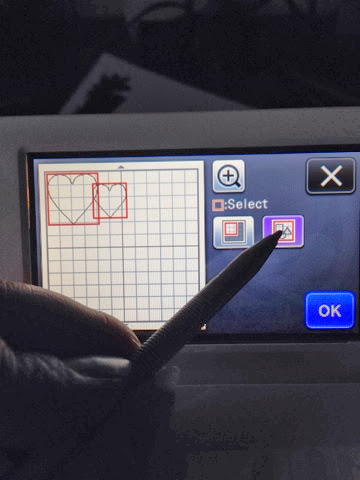
Select both your images:


Tell the machine you want the shapes on your mat:
 And then hit okay, then weld:


It asks you if your sure, click yes and then you're ready to cut:


Happy with that. Very simple. The hearts you will notice I have chopped the end off!! This was because I worked out where to cut on my card - which worked perfectly (apart from the fact that I forgot the end of the card didn't go to the end of my mat - duh. Completely my fault).

Now, I have officially run out of time :(

Boo. I do hope I get to use the machine a little more, as I know I have only scratched the surface of this machines capabilities.

Join us live on Saturday, when myself and the wonderful Mel launch the brother scan and cut. I've got a few more questions now :)

Thursday, 9 January 2014

Sneaky peak


Our first guest, the lovely Kim from spellbinders. So looking forward to sharing their world launches with you!! Eeeek.

Okay, here's a couple of samples, just to wet your appetite:


Mmmm, spellbinders 3d m-bossabilities. Amazing.

This is a copy of the floor plan: