Showing posts with label Christmas Crafting. Show all posts

Thursday, 24 December 2015

55 days - crafty countdown - the last Chritmas Card

Yesterday I said my mum had 3 dogs - my ability to count has really gone down hill!! They have 2 dogs - which to be honest, is still a house full. And I'm afraid yesterdays pressie won't be up for grabs, as Doc chewed it up!  Sorry.

This will be my last little Christmas card in this countdown - and again I had a rummage and came up with pretty papers, and one of my favourite products, Cosmic Shimmer PVA.  I brought with me some of the Tim Holtz Distress Stains, I love the Picket Fence.  It's white, but not as heavy as an acrylic paint.  You can see here, it lightens the paper slightly for me:


I created a circle, as my plan is to create a mistletoe wreath.  I saw such a pretty one whilst I was out shopping, so got my inspiration from that


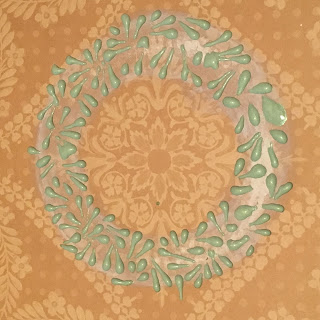
I didn't bring paint with me, but my mums cosmic shimmer is already coloured, and dries with a raised finish.  Start with a blob, and pull the PVA down so it trails off, and forms a point.  I covered the white circle with the little leaves, making sure they point in different directions


As you can see above


I needed to dry the speeding process up (it's Christmas eve, and I've prosecco chilling) so I used my heat gun.  The colour really comes out, and the shine of the pearlescent PVA shows really well on this picture


To create more depth, I used a watercolour pencil in some of the gaps


And then I used a waterbrush to move the pencil crayon and give a really nice soft finish


I made sure I didn't cover the white completely so I will have shading


Now I need the mistletoe berries, for this I used the Cosmic Shimmer again, but the white pearl.  Again I dried it with my heat gun


To emphasis the wreath I applied Distress Ink around the edge of the card up to the wreath.  I left the centre, again to create depth


I love this picture, as it looks rubbish!!  Sometimes (often!!) when I'm doing something I look at it and think - that's awful.  And then it's a challenge to try and make it look half decent.  Don't give up.....well, not until you've spent over 3 hours on it :)


I like trying different layers as well, they really do make a difference to the finish of the card, as you will see from these 3 photo's


I cut the card down, as you can see.  And then inked around the edge, to make the distressing more even


Gently remove the ink which has covered the white of the mistletoe berries with a sponge.


I then added a sentiment, a lovely red ribbon, and finially I used glitter glue to add just a few white sequins


I'm really chuft with this one - I'll make sure Doc doesn't get to eat it.


Okay, Prosecco time.  Have a wonderful Christmas Eve everyone, I will join you again tomorrow xxx

Tuesday, 22 December 2015

Only 57 days to go - the Crafty Countdown

Seeing as yesterday was an arty one, I thought today I'd do something nice and simple.  It's funny, as sometimes I feel doing a nice "easy" card is somehow cheating - but that isn't the case at all.  It's often nice to do something not as taxing - but put your own mark on it.  And just because something isn't "different" it certainly doesn't mean it isn't pretty or that work has gone into making it. So, after giving myself a talking too, I had a rummage, and found these:


These are from a CD which I printed off ages ago.  I think it was when I was doing a class for Crafters Companion.  I like working with CD's, just because everything is there at a click of a button.  I'm not generally a fan of doing decoupage, as I'm not really into cutting out - but I really like this image, so decided to have a little go.


I cut out the different decoupage elements to begin with.  I had printed these on card, so they are nice and substantial, and can be shaped if needed


I wanted to put my own spin on it, so I opened up the little window on the top layer


I then just took a bit of ink and coloured in the edges of the doors, so the white of the card wasn't really noticable


I then layered up the decoupage, using 3D foam


I then dug out some rub ons.  I really like these, they are a good size, and rub ons give that almost stamped look to your project.  And they go on a number of different surfaces...


....like vellum.  I popped the sentiment near the end of the piece of vellum.  I wanted a longer length at the left hand side, as I needed to hide the adhesive (with it being vellum, you can generally see any adhesive you use) - so pre-planned how I was going to attach it to the card


I cut the right end to form a tail


And the left side I cut into a point so it would fit through the window.  Now, I planned where I was going to fit my banner - but not how!  So when I came to feed it through the window, I hit the 3D foam.  I gently peeled the top layer of decoupage back up, and slotted the vellum under the 3D foam, which held it securely in place.  I curled the vellum a little, to give it a flowing movement.


You will see I popped the other message at the top of the card, and then got utterly carried away with my glitter.  It was in the sky, and on the top of the roof tops.


Finally I coloured the little hearts in the door red, so they stand out.  I'm really happy with this pretty little card :)