
Yesterday I showed a card I made years ago - way back in Topaz Crafts days!! Funny how some old techniques don't look dated. This technique is one that will be good for years.
Initially, my problem was trying to find gloss card, as I knew the technique required a good quality high gloss. I managed to find two A5 sheets - not even A4!! Anyway, they did the job. The ink pads I used were Adirondack, which are a Dye felt ink pad.
First, apply the ink directly to the card, by wiping the pad over the top of the card;


Next just spritz with water

You can either leave it to dry naturally, or blast it with a heat gun. The type of heat gun you use will give you a different effect. If you use a strong heat tool, you will move the water, and "chase the drip". It looks good, but will create "veins" of ink. Alternatively use a slow heat tool:

The next technique is streaking the ink over the card again, this time I've used two different colours, and then just used a tissue or sponge to blend the ink


I love how it looks, as you still get the streaks of colour, but the inks blend slightly to give a perfect finish. You can shine the card with a soft cloth to get the shine of the gloss card to pop

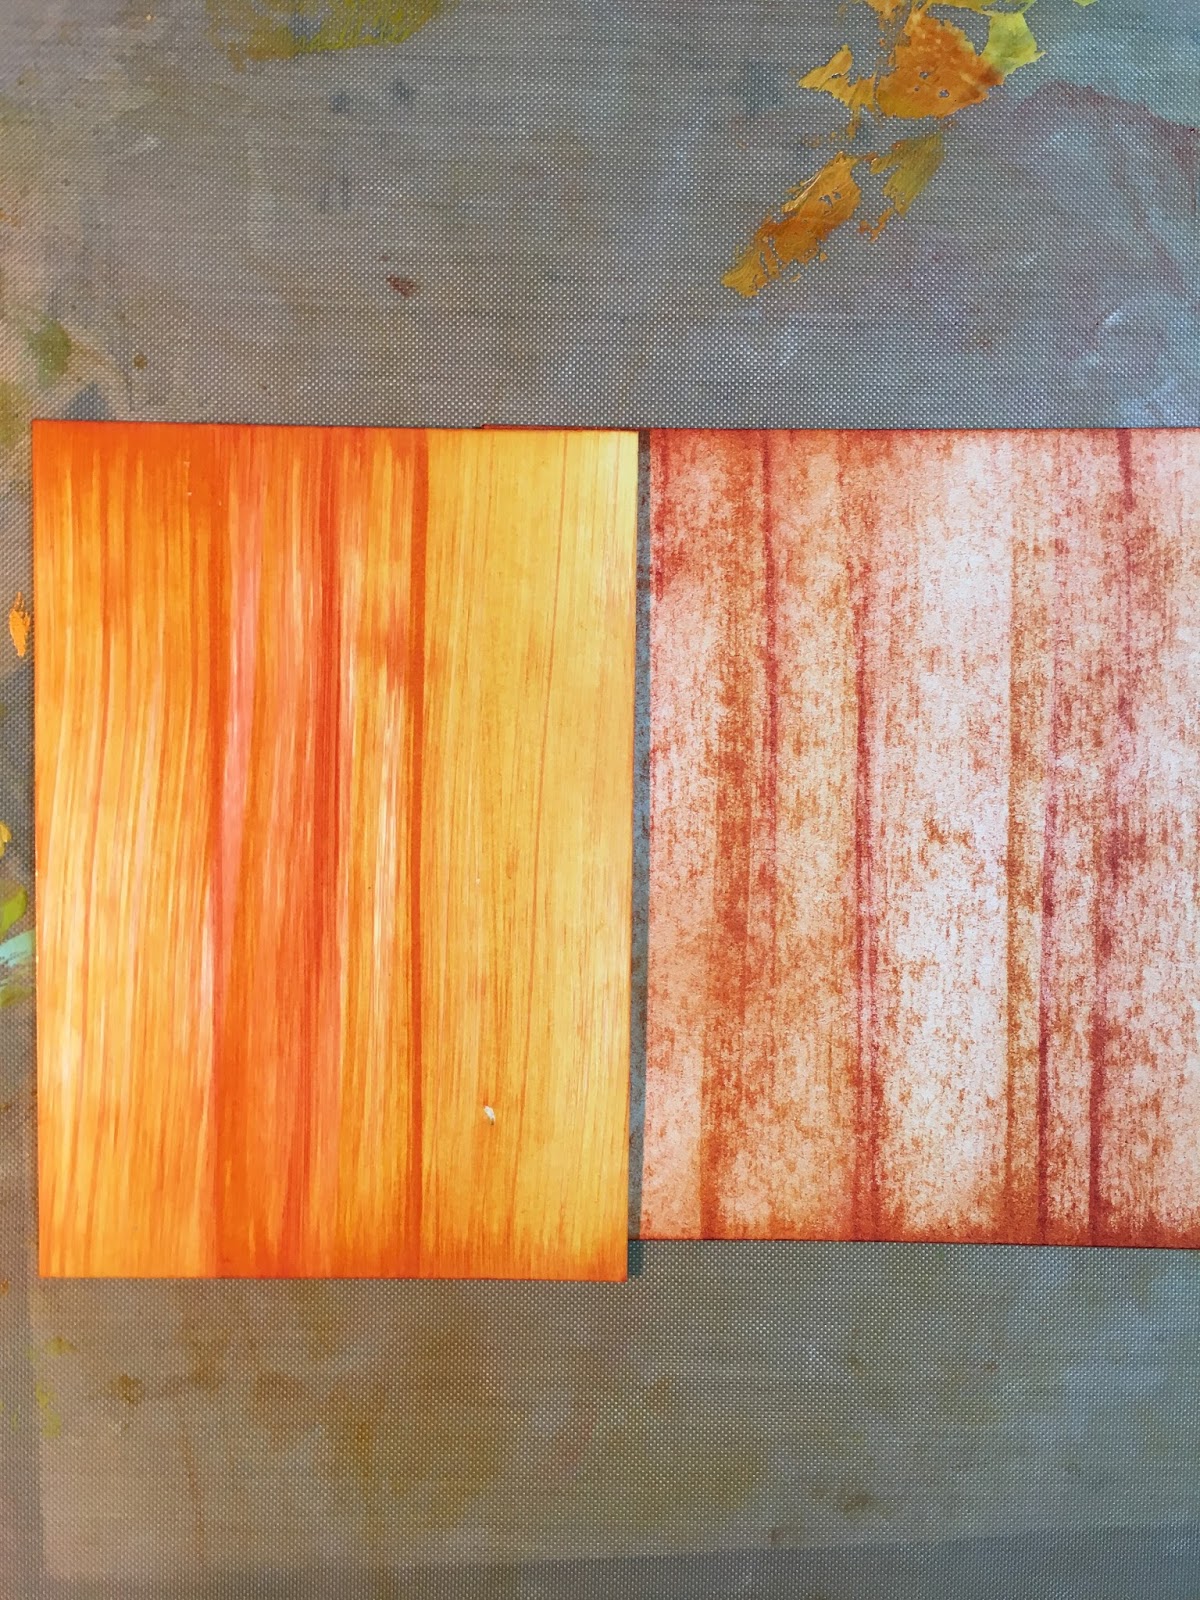
I wanted to show you how the exact same technique looks like if you use uncoated card stock. So, I've applied the ink directly to the card

Spritzed it with water, and then dried it with the heat gun

It gives you a completely different look - literally just depending on the type of card you use

See, when you hold them up next to each other, you can see how dramatically different the results are!

Now, I've tried the same technique with the two different colours

Again, I just used a cloth to blend the ink. Look at the difference! Precisely the same technique
Now I've overstamped onto my backgrounds, again to show you how different these look. Beautiful stamp again isn't it.

Okay, I decided to use the bottom left card, to make into a proper card. I took a piece of patterned paper, and over stamped, using the Adirondack ink to bring the colour into the background.

I then stamped a vine up the side

And popped my main image on, together with a sentiment, to see how they look

I used the same paper to stamp a flower and a swirl

And then inked a little blue onto the flower and swirl

and then blended in a little of the Adirondack

I laid the elements on, again to see if I was happy. Keep doing this to check on the progress of your work

I wanted to glaze my flower, and used my versamark pad, with clear embossing powder. When the first layer was melted, but still hot, I sprinkled a little gold embossing powder, and then clear powder over the top, and heated. The clear over the gold, breaks the gold up, which I hope you can see from the picture. It's subtle, but looks effective.

I then covered the sentiment with versamark, and clear embossing powder

Check again, to see what it looks like

And then assemble.

I added words, as the sentiment says we are the hero of our own story, so I wanted little extra words, that may make up that story

I hope you like it! Tomorrow has to be a quick post - as it's party time (sore throat, or no sore throat, the party must go on) xx

11 comments:
I love everything about this card Leonie. The way you have built it up reminds me of techniques I had forgotten, so thank you !!
Happy New Year !! Xxx
Leonie..you are a great presenter..but an amazing teacher. Another fab technique. Hope you've recovered enough to enjoy youself. X
Leonie..you are a great presenter..but an amazing teacher. Another fab technique. Hope you've recovered enough to enjoy youself. X
oh this is fab. that face is just haunting. i've put her on a canvas.... here's the link if you fancy a look: http://craf-ther.blogspot.co.uk/2015/07/egyptian-girl-or-ultra-modern.html
happy 2016 xx
This is stunning, love the techniques and you are a fabulous teacher, must give this a go. Thank you for sharing.
Hugs
Linda xxx
A super card, I love to see cards with techniques. 49 and counting........... xxxxxx
Hi Leonie.
Thank you so much, these techniques are brilliant and a beautiful card.
I wish you a very healthy and happy new year.
Leonie remember alcohol Kills germs have a great time Kitty.
ps so does ice cream.
Great the way all the different inks and papers change everything. Thanks Leoni for going through them. Hope you have a wonderful night and an exciting New Year x
WOWSER! What differences you get from the different card stock. The card is amazing. I hope you enjoy tonight, I'm off to a Salsa function with husband, daughter, her fiance and loads of friends
Hi Leonie and thanks for taking the time to take us all through every stage of your card. My best wishes to you for a happy and healthy new year - get rid of your lurgy! - and for lots of happiness in you new venture. Best wishes Jackie x
Thank you for taking us through all the different parts to making up your gorgeous card. Also for showing us how the technique looks so different on the different papers.
Post a Comment